Tape and Mix Console modeling plugins for your DAW have been available for some time now from different software developers. The ones that spring to mind are VCC and VTM by SlateDigital, UAD Ampex and Studer, Satin from Uhe, McDsp Analog Channel and the Waves NLS or newly announced Waves J37 plugin.
Personally I like the Slate Virtual Console Collection and Virtual Tape Machine plugins but this article is not meant to compare the different modeling plugins available. That’s way too subjective and I rather leave it up to you to decide which one you prefer. Many developers allow you to install a time limited demo of their plugin. I suggest you pick a gray weekend with drizzly weather and spend it comparing the different plugins before deciding on which one to buy. What I am trying to show you in this article, is an analog workflow emulation that delivers a sound closer to analog and that lets you get the most out of your tape and console modeling plugins. So let’s get going.
Analog signal flow
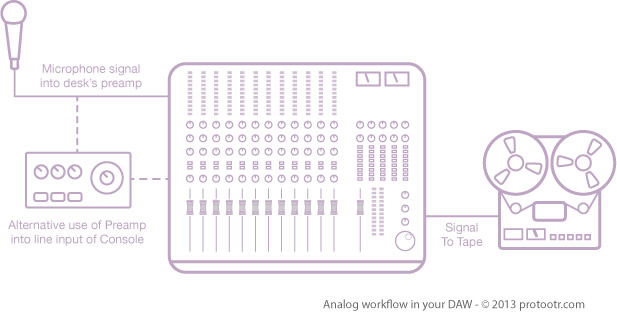
As with any recording it is obvious that you use the highest quality microphone you can get your hands on. Choose the best mic for the job at hand and if possible try more than one. The microphone is then connected to the preamplifier. This can be a high quality stand-alone preamp or the one built into the analog mixing console. If you are lucky enough to currently work or have worked with a high end analog console like for example a Neve, you know it has fantastic sounding preamps built-in. So having such a desk at hand, using an external preamp is something you would only do if you’re after a specific type of sound. The workflow with your DAW is basically the same except that your preamp is probably the one in your audio interface or maybe you use a boutique external preamp to get a better sound quality.
When an analog console and a tape machine are your main tools for recording and mixing, your studio is completely built around them. You have no other choice than to work with these because you simply can’t just grab another flavour desk out of your stock room (although there are some high end studio’s that have more than one of each). This means you are ‘stuck’ (unlucky you) with the sound of the console and tape machine that you use and you commit to it. As some of you might know, I am all for committing to sounds when working in the box. If you want to get an analog vibe and workflow, you have to make decisions on when to go for a certain sound. Many try to keep their options open by leaving all virtual instruments active in their DAW and keep every processing or effects plugin in the signal chain. Beside the extra strain on the computer’s CPU, this can overwhelm you with options during mixing and consume way too much time trying to get a sound you are happy with.
Once you record a signal to tape, that’s it, there is no going back. Any processing you used during recording is embedded in the sound. Your only option would be to bring the talent back in and re-record it. This makes engineers, working with analog consoles and tape machines, think hard about the sound they commit to tape and every step from recording to mixing. Working with a DAW on the other hand gives you full tweakability of almost every sound aspect and parameter. We tend to postpone certain decisions until the final mixing stage. This can seriously extend the production time and doesn’t necessarily lead to a better sound. I personally believe in a hybrid form where fundamental sound defining processing is done during recording, and correctional or any other processing is done during the mix.
If you think about it, you are already committing to a lot of sound defining elements when recording. The choice of microphone, preamp or guitar is done before the recording process and it is rather difficult, or at least very time consuming, to change these afterwards. It is therefore best to take plenty of time and think about how you record an instrument and how to get the best microphone placement and optimal signal flow. This whole process of committing to sounds ultimately leads to a better production. The same goes for bouncing the sounds of virtual instruments in your DAW. It might seem scary at first but you gain confidence with experience. Life is all about making choices.
Once the signal enters the console it may receive some processing in the form of a high pass filter or maybe some light compression or limiting to keep any peaks under control. The signal is then routed to the Tape Machine. It’s obvious that the analog console substantially influences the sound during the recording process.
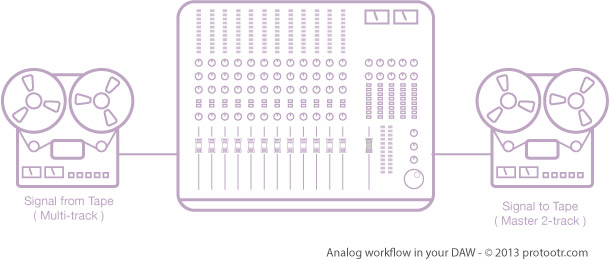
Once all tracks are recorded, the song is ready to be mixed. The controls on the mixing desk are nulled or reset and all tracks on tape are routed through the desk to the master output and onto the master 2-track tape recorder. During this stage the analog desk again has its influence on the sound of the production. Many tracks like drums, guitars and vocals are grouped and routed to a submix buss and then send to the master buss. Effects like Reverb and Delay are added via Aux Sends in the console. And finally the mix is recorded to the master 2-track tape recorder.
Emulating the signal flow
Analog modeling plugins demand a lot of your processor, especially in projects with a large number of tracks. If you want to get a close as possible ‘analog’ sound in the box and have cpu processing power to spare, it is best to stick to a certain workflow.
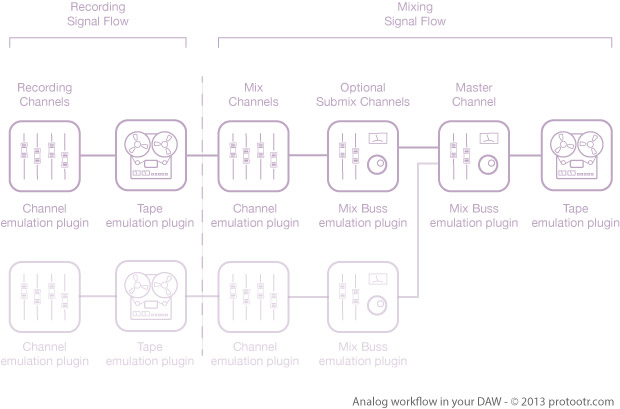
The above diagram shows a plugin equivalent of the signal flow in an analog desk. The recording part of the signal flow, shouldn’t have to take up any processing power at all during mixing. You can do either two things. The first is to record all of your tracks in real-time through a console and a tape modeling plugin. This will embed the analog characteristics during the recording. If you have a system like a UAD Apollo with a UAD compatible modeling plugin you can record through the plugins with very little latency. Tape modeling plugins often give more latency than channel modeling plugins. VCC from Slate for instance is no problem at all, you can record through it without any latency as long as you use a low buffer size. But VTM from Slate reports a latency of 1729 samples in Pro Tools at 44.1KHz/24-bit. This is of course too much to record through.
So if you don’t have an Apollo and the plugins give too much latency to be record through in real-time, you can always place the plugins on the tracks after recording and then bounce the tracks with the plugins in place. One disadvantage with this is that your workflow becomes a bit more complex. In for instance Logic, you can use the Bounce In Place function to embed the moeling sound in your audio. If you use Pro Tools you can bounce the tracks to new tracks and then deactiveate the original tracks. Pro Tools 11 now also makes this a very fast process.
Depending on the number of tracks and the power of your CPU, you can now Mix your song live through the modeling plugins for the Mix Down phase from the diagram. A console channel modeling plugin on each track and a console buss modeling on each Mix Buss should do the trick. The final step is placing a Biss modeling plugin on the master buss followed by a 2-track Master Tape modeling plugin and of course any EQ or Master Buss compression. Depending on the quality of your modeling plugins, this can create a life like analog sound emulation. It is all a mater of taste of course.
Do expect to get a somewhat higher noise floor with this approach, but hey, that’s part of the analog signal flow as well. Having a good gain structure from recording to mixing becomes important again. You have to keep an eye on your signal to noise ratio. If your modeling plugins allow you to turn off things like tape hiss, you can reduce the noise floor. But this is cheating of course.
Adding Virtual Instruments

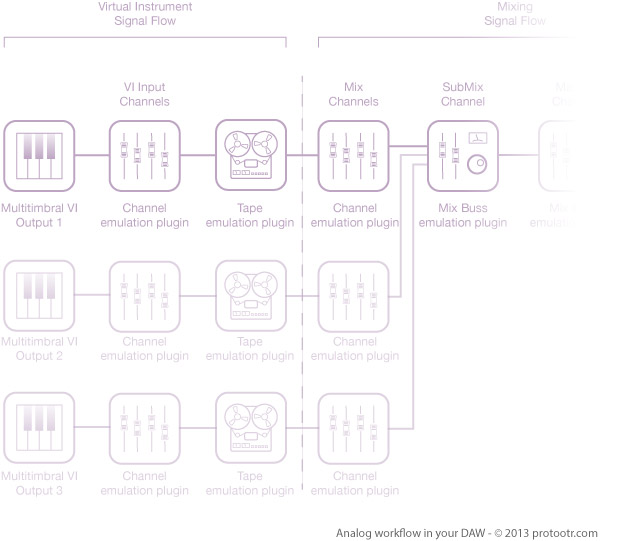
If you your virtual instrument is multitimbral, like a drum plugin, you can route individual outputs of the VI plugin to seperate audio tracks, insert the analog console and tape modeling plugins on the tracks and bounce these either in place or to new tracks depending on your DAW. the diagram below visualizes the signal flow of a multitimbral virtual instrument setup. The bounced tracks can then be given a new console channel modeling plugin, just like in the first example with the recorded audio tracks.
Is it worth it?
The final result of this workflow is depending on the quality of the modeling plugins you have and how well they stack. Make sure to use proper gain structure from the beginning of the project. This keeps the signal to noise ratio as low as possible. Now it’s up to you to decide whether the result is worth the work. Using just one modeling plugin per track during mixing can already give a great result but with good quality modeling plugins you can lift it even further. Don’t wait for your next recording project. Use a gray weekend with drizzly weather and try it on an older project. Strip the session file from all EQ and compression plugins. Null all your faders and pan pots. Then add the modeling plugins on audio tracks, instrument track, mix buss and master tracks. Bounce them the way we discussed and start your mix from scratch. This should give you a good idea whether this workflow is worth the extra time. And remember for your next project. Spending more time placing microphones, tuning instruments and committing to sounds will give you back a multiple of the time that you need to spend to add the analog plugins this way.
Let us know what your experiences are.