One of the major software and hardware releases this month is of course the release of Native Instruments Maschine 2.0 and their new flaghip controller Maschine Studio. This new controller has two build-in high resolution displays, a jog wheel, build in master output metering and more dedicated buttons. Native Instruments have assured their customers though that the new 2.0 software will work with ALL Maschine hardware controllers even the MKI. I will go over the the hardware integration in another post. In this review I will focus on the new feautures in the software.
Purchase and Installation
Buying the Maschine 2.0 update from Native Instruments’ (NI) online store was a quick and easy process. Downloading on the other hand turned out a bit more difficult. After purchasing you receive links to downloader apps for Maschine 2.0, the Maschine 2.0 Factory Library and Komplete Selection. These apps are 26.5 MegaBytes each and downloaded without a problem. Launching a downloader app you are asked for your NI account details to check whether you are eligible for downloading the upgrade. This is where it went wrong for me, logging in seemed to go well but after a few seconds the downloader app presented me with a ‘Not Authorized Error’ without any clue or information as to what went wrong. After a few more tries I gave up and decided to call NI’s support. They were very friendly and immediately asked me whether I had a special character in my password, which I did, I used a plus sign. He suggested to log into my account on NI’s website and change my password to something with only letters and numbers. After changing my password the downloader apps worked without a problem and the total download of 10 GigaBytes took only 25 minutes to complete with my 200 Megabit internet connection.
Installation had to be postponed though, as it took NI another day to verify my purchase and mail me the serial numbers for Maschine 2 and Komplete Selection. After that the installation was smooth and using the serial numbers in NI’s Service Center application worked straight away.
Maschine 2.0’s New User Interface
 It has taken NI over a year to release the 2.0 update but the end result has been worth the wait. Open Maschine 2.0 for the first time and you immediately notice the improved browser on the left side of the screen. Big colorful icons show the different libraries and virtual instruments that you have installed. The new tag function makes it a breeze to quickly find the sounds, samples or effects that you are after by clicking on the tags and its attributes. Maschine 2.0 also lets you tag your own sounds and samples making it possible to retrieve them in the blink of an eye. Two new buttons let you switch between the user’s location where you save all your own material or the Default location where all of NI’s libraries are saved. The search function also feels snappier and instantly delivers results corresponding to the keywords you type. This browser might be the least sexy part of Maschine 2.0 but it will definitely speed up your workflow and production.
Mixer View
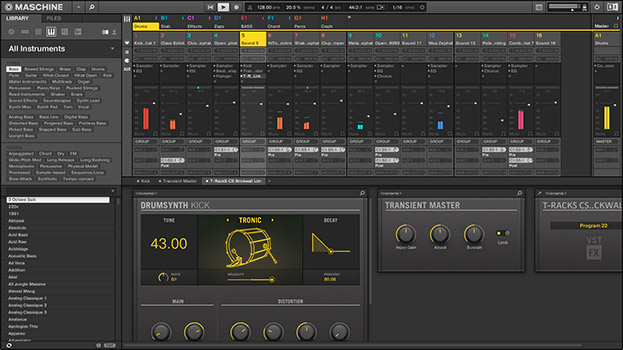
Another major addition in Maschine 2.0 is the new Mixer view. At the top left corner of the Arranger you find a new Mixer button. Clicking this brings up the Mixer view which is divided into two halves. The top half shows the volume levels and metering. The bottom half shows the Plugin Strip with the plugins used on the currently selected Sound, Group or Master fader. When you open the Mixer view it shows all the active Groups with their corresponding color. Double clicking a group shows the faders for all the Sounds in that Group. On the far right you always have the main fader of the selected Group. Selecting the  Group fader shows any inserted plugins in the bottom half of the screen called the PLugin Strip. Double clicking the Group fader replaces the Sound faders in the Mixer view with the faders of all the active Groups plus the Master fader on the far right.
A Mixer module is vertically divided into different sections that can be shown or hidden with their buttons on the far left of the Mixer view. The buttons from top to bottom are the IO section, the plugin insert slots and the AUX sends. As mentioned earlier, any inserted plugins show up in the Plugin Strip in the second half of the Mixer view. You can scroll through multiple plugins from left to right. NI plugins are always shown with their interface, while third party plugins receive a proxy panel with just the name and a preset selector. You can open these in a floating window by double clicking the plugin’s insert slot or a little arrow in the Plugin Strip. This also works for NI’s plugins and is particularly handy for plugins with a large user interface. Some NI plugins also have an interface simply too large to show in full in the Plugin Strip. You can click a pencil button only available in the floating window to see all parameters. I would have liked to see the full interface of third party plugins in the Plugin Strip. As it is now you always need to take an extra step to change their parameters.
The Mixer view is a very welcome addition to Maschine and one that was on the wish list of many users. One nuisance I have with the Mixer view, is the rather small triangle used for the Fader knob. I mostly change levels on the controller during song and beat building, but when it comes to mixing I would love to have bigger fader knobs. I feel it takes just a fraction too long to quickly select the faders when setting up the mix balance.

Arranger View
The Arranger view has remained the same for most part. There are some very welcome changes though that improve the workflow. Before Maschine 2.0 you couldn’t see the original length of a Pattern in the Scene. Shorter Patterns are automaticaly repeated to gain the same length as the longest Pattern in the Scene. If you had a 4 bar pattern on Group 1 and a 1 bar Pattern on Group 2, you couldn’t tell the difference. Maschine 2.0 fixes that by showing all patterns in their original length and use darker ‘ghost’ patterns for the repetitions. This makes working in the Arranger easier and faster.
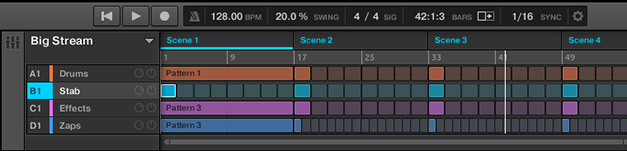
The Arranger view in Maschine 2.0 with a much better Pattern lay-out.
New and Added Plugins
On top of the already generous Massive, Maschine 2.0 now comes with some extra full versions of Komplete plugins. Scarbee Mark I, NI’s electric piano modelling plugin, comes free with Maschine, as well as Reaktor Prism a great ounding synthesizer. One other very nice addition is the Solid Bus Comp plugin that has the ability to ‘glue’ your mix together.
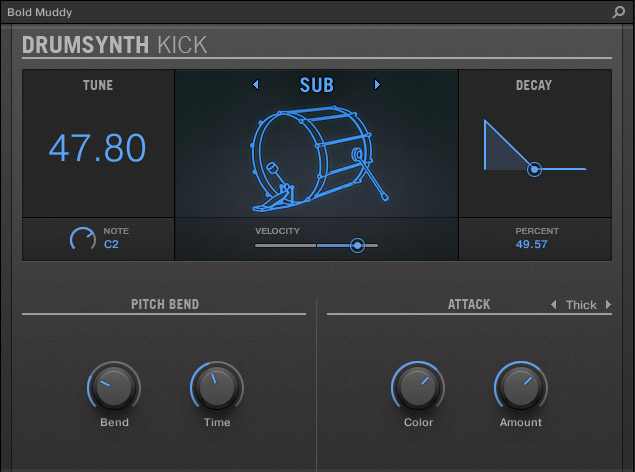
But the best addition to Maschine 2.0, in my opinion, has to be Drum Synth. This baby allows you to create very good sounding acoustic and electronic Kick, Snare, Hihat, Tom and Percussion sounds. In the two weeks that I have been using Drum Synth I have grown to love its ease of use and results. The way it works is, you first choose the sound you want to create like Kick, Snare, Tom etc. Then you select the base sound and then adjust parameters like Tune, Velocity, Decay, Noise and others. The variety of sounds that Drum Synth is capable of producing with a minimum of parameters is just astounding. And of course you can edit them all from your controller allowing you to quickly come up with new sounds. Drum Synth alone is worth the update price. It’s really that cool. I might cover Drum Synth in a separate review soon.
Under The Hood of Maschine 2.0
It’s not just Maschine 2.0’s looks that have changed. There’s a lot of tweaking done under the hood. The all new audio engine now sports the much coveted multicore processor support. This lets you use as many plugins as your processor allows resulting in more sound processing capabilities. The new engine also releases Maschine from the shackles of limited Group numbers. You can now create as many Groups as you like, which consequently gives you an unlimited number of Patterns.
![]() The multicore processor support doesn’t bring a proper CPU meter though. The current CPU meter gives you very little information about CPU usage. Some may ask why that is important, as you might only want to be warned when the processor can’t cope anymore. But I would at least like to see some sort of average percentage so I can plan my project ahead in terms of virtual instrument that I use. A memory usage meter might be a nice as well to keep an eye on how much RAM is left for loading new samples. And while I lay bare my wishes, a better resolution floating master meter would be a feature as well. I know you can now insert a metering plugin on the master fader and have that sitting somewhere on your screen. But that’s an extra step to take. After all, Maschine’s concept is about a super optimal workflow isn’t it?
The multicore processor support doesn’t bring a proper CPU meter though. The current CPU meter gives you very little information about CPU usage. Some may ask why that is important, as you might only want to be warned when the processor can’t cope anymore. But I would at least like to see some sort of average percentage so I can plan my project ahead in terms of virtual instrument that I use. A memory usage meter might be a nice as well to keep an eye on how much RAM is left for loading new samples. And while I lay bare my wishes, a better resolution floating master meter would be a feature as well. I know you can now insert a metering plugin on the master fader and have that sitting somewhere on your screen. But that’s an extra step to take. After all, Maschine’s concept is about a super optimal workflow isn’t it?
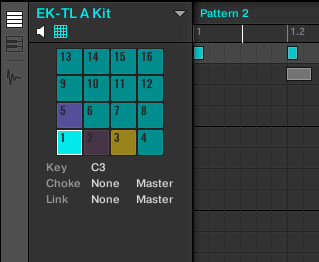 Maschine 2.0 does a lot to improve its workflow. Small additions like the new way with which you can now select sounds via a visual overview of the pads. Or what about the improved Sampler and the Sampler playback module, with all parameters clearly layed out on the screen. The new are just two of the many improvements added.
Conclusion
Maschine 2.0 is a fantastic update delivering many long wanted features but also great new additions. Minor points aside, like missing a real fader knob and the rather small CPU meter, this update is well worth the $99 US or €99,- update price for all Maschine users regardless of the controller you have. Some elements haven’t been discussed at length in this article, like the integration of Maschine 2.0 with older controllers. But I can assure you it is a big improvement no matter which hardware you have. I tested Maschine 2.0 with my MK2 controller and it works really well. Many functions are better organized and easier to control. I’ll think about doing a special about using the MK2 controller with the new software.
There are many improvements in Maschine 2.0 and I haven’t come close to reviewing them all. I particularly like the much better workflow in the Arranger view and the way you can control plugins now. But this new software version also packs great new features. Multicore CPU support, the Mixer view and the new plugins and virtual instruments all make this an update worth its price. The feature that makes it a real no-brainer, is the great sounding Drum Synth. Expect a separate review on this real soon.